Showing posts sorted by relevance for query tyvek. Sort by date Show all posts

Wednesday, November 11, 2009

Heavy vs. Light

Dichroic glass=very heavy. Especially for quilt embellishments. To support a piece such as the large triangle on the left without distorting the quilt surface would take some engineering. Which is probably why these are unused as of now. Maybe they should just be jewelry instead, several of them look like they'd be great pins. I think Margaret Ball gave me these ages ago and I'm sorry I haven't ever used them, just taken them out every now and then and enjoyed looking at them. They have so much depth and you always find something new to see within the glass. They've been in a little box which just got discovered (during my recent embossing heat gun search) with these completely opposite embellishments-to-be-used:
These are metallic painted and heat treated Tyvek "jewels". That's how I always think of these, because of the shiny metallic paint that I used, they really glow and have a nice shine. In a different way than the dichroic glass above of course, but still shiny. I think they have a lot of presence because of their unusual and organic shapes, you're not sure what exactly they are, so they require more up close investigation.

The way that the Tyvek folds in on itself and bubbles up is so unpredictable which is a big part of the fun of making these. They are easy to use as an embellishment on a quilt, you can pierce them pretty easily with a needle and they are super lightweight and easy to bead upon.
Another reason that I need to find my embossing heat gun, so I can make some more of these!
I've used Tyvek embellishments on two quilts Meteor Meltdown and Open Book, Blue and I think I need to definitely use these in some upcoming quilts.

Wednesday, August 17, 2005

Weird Quilt


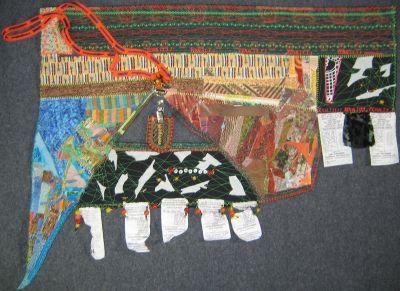
The QuiltArt list was talking about the weird quilts in Quilt national this year, guess there are some unusual materials used (to which I say cool!), and the topic morphed into a challenge. Now I'll admit, I'm a sucker for challenges. I've done almost ALL of them actually. And I feel I make weird quilts, let's just say, a lot of the time. I have to consciously work at it to make a normal quilt. A lot of times my weird quilts come about by me being lazy. Too lazy to get out boxes and boxes of fabrics and pick and choose the perfect colors. Instead I'll just reach over to the right side of my work table and pick things out of the pile of scraps, or is that heap, it is usually about a foot high. So this time the first thing I laid my hands on were the "Do not remove under penalty of law" tags from the pillows that I made my mom last month, and I was off, eventually making this quilt which is named "Penalty"
Here are some details so you can see what's going on.

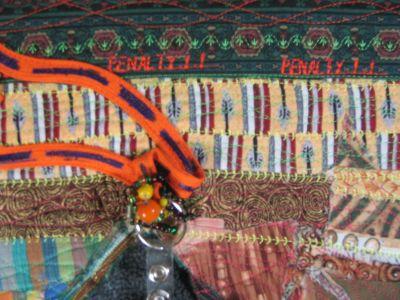
This shows the penalty tags, which by the way are heat reactive, must be some type of Tyvek like material. I liked how they curled and crumpled when I hit them with the steam. Then I added the beading.

The white shapes were scraps from the Kona coffee quilt, cutting out the blossoms. And remember I never throw away anything.

This detail shows the stitched out word: Penalty, and the freebie conference badge/pass tag complete with clip. It was fun to bead upon!

Another detail to see the stitching. I had fun using the Madeira polyneon (really is neon colored), with the cool stitches on the new machine (Janome 6500).

And here is my materials and artist statement in case you want to read it!:
Materials: Cotton scraps, cotton knit, convention pass tag/clip, glass beads, fusible batting scraps, metallic thread, polyneon polyester thread, letter beads, edge trimmings from quilt sandwiches, silk burnout chiffon, gold glitter pen, sharpie markers, pigma pens, selvedge edges, tyvek "do not remove under penalty of law tags from pillows."

Artist Statement:
Weird in this case is the shape, the materials, the message. I always found it weird that the labels that arrive sewn into the seams of our pillows, mattresses and other stuffed items don't always get removed by we consumers. We read the "Do Not Remove Under Penalty of Law" line, and read no further. Instead we put up with scratchy, sharp, noisy labels under our ears and hope for them to eventually soften up with washing. Pay attention and read the whole thing, there are NO mattress police that will swoop in and nab you if you cut that tag off. Really.

Monday, October 19, 2009

Scary Doll How-To

Here's a Scary Doll how-to, to make the doll I showed in my Halloween Party post on Saturday. I got the idea from WiseCraft ,but their starting dolls were fashion dolls (ie Barbies), our Goodwill was fresh-outta-Barbies so we snagged this curly haired doll whose hair was a little out of hand to start with.
The first step is to spray-paint the doll with a matte white spray paint. Front and back, hair included. Do a couple of light coats. Outside of course! My son Alex helped me out with spraying so I could take an action shot. I figured if I tried to do both I'd end up spraying either myself or my camera lens somehow.
A little paint ended up on my camera body anyways as I was turning the freshly painted doll over and then picked up my camera. sigh.
We chose not to spray paint her clothing but to instead "distress" it.
She was scary looking enough already for me at this point.
But Alex thought we needed one more step, involving the application of shall we say, excess and concentrated heat.
Here she is after being ever-so-slightly singed with a heat gun used for paint stripping and Tyvek melting. I think this made her even creepier, more worn out and old-looking, kind of ratty and dirty and decrepit. And by the way if you do this burning step, do it outside (very stinky since all the materials are synthetics), and have a source of dousing water at the ready.
I think she's pretty scary looking. In the original instructions they were suggesting going over the faces with black Sharpies to make more zombie looking faces, but I like this ghostly apparition vibe.
Turns out that certain teenagers are more creeped out than you would imagine by this little ol' doll, which is why I keep putting her in unexpected places. Hey, I've got to keep them on their toes somehow. And get back for all those times they put the plastic scorpion in my shoes (Rotten Little Monsters!).

Monday, July 05, 2010

Yes I Made It

Here is #25 in the six word memoir quiltlet series, it is misnumbered here, whoops.
I used my ticket and wrist band for the Maker Faire that we attended. Sewing through the Tyvek wristband was very easy even though it is slippery stuff.
The words say: "Yes I Made It By Myself."

Tuesday, July 06, 2010

Wiping The Slate Clean

And now I'm caught up on showing you all the six-word memoir quiltlets I've made so far, this one is #26. Woohoo! Half-way done with the year.
The words say:
"Wiping The Slate Clean, A Do-Over."
This is made with the back of a white Tyvek bubble wrap envelope I recently received with my new Moo cards. I got the right kind this time, last time I inadvertently ordered business card sized when I wanted the skinnier Moo cards. If you see me, ask me for one! I think they turned out really cool, and mark a new beginning (at least in my mind) with how I'm doing this art making thing.
The envelope was nice to sew on and yes, I popped quite a few of the bubbles as I sewed along. In the second picture you can see where I ran out of thread leaving behind a trail of holes that will never close up (at least without any help!).

Saturday, October 21, 2023

Dyed Strips

 Each of the original 12 fat quarters has been torn into four strips and then those have been grouped into 10 different dye colors that'll be used in the over-dyeing process.
Here are strips from the original 12 fat quarters as seen in the group shot yesterday. These are working as the "control group" for this over-dyeing process. They've got their little paper tags with the safety pins because they're no longer going to be getting in a dye bath.

Some of the groups have more strips than the other groups, but that's how this works out with the dye colors we're working with.
I had to accordion fold and then steam iron the folds for each strip. I'm hoping this will create a sort of cross-hatch grid work look.
Here you can see one group's strips, with their machine-embroidered codes on the selvedge. Other methods of marking are also used like various waterproof markers, sewing on small squares of Tyvek with the information written on them, etc. But with 36 strips now, you've got to keep track to see which color interacts in which way with the other dyes.

Now they're all rolled up and ready to dye. It's a little fiddly, but keeping track of which color got over-dyed in what other color is going to be very interesting. I can't wait to compare them all!

Sunday, January 16, 2011

That Was Some Week

Here is number 41 in the weekly series of six-word memoir quiltlets from last year.  Yes, it was surgery week, middle of October.  And no, I didn't complete this quiltlet actually in that week (obviously!), but soon thereafter.   This one is not too exciting or innovative, as far as materials go, the hospital bracelets are some type of Tyvek-ish material, easy to sew through, and the three circular metallic snap/plastic things are from the EKG. 
I wish I'd stolen one of my hospital gowns to use as the background, but I didn't think of it at the time (gee I wonder why?!).  The gowns were actually quite raggedy with a lot of fraying and holes which really surprised me. (so were the sheets now that I recall.)  I almost used red thread for the stitching, but thought that would be a bit too much since there was already the red-orange allergy tags.

Words say: "Surgery Over Quickly. Sent Home Fast".  And thank goodness for that.  As anyone knows who has ever spent the night in hospital, it is really hard to get any rest.  Even though they've got you on these great mind-wiping drugs, the nurses have to keep waking you up to take your blood pressure, etc.  I know, I know that it is necessary and all, but it is really irritating, and a good indicator of when it is time for me to get out of there and get home.  I was glad I ended up being there for only two nights, especially since it meant that the biopsy was normal, pshew!).  Guess this was a celebration quiltlet in a way.

The sewing machine needle got pretty gummed up as I sewed around the EKG discs, that glue that sticks the disc to your skin is really something.  I had to keep stopping and wiping the needle off with some rubbing alcohol.  It probably didn't have to be stitched as that glue wasn't going anywhere, but just in case...

Wednesday, January 25, 2006

Material Evidence

Here I am at the recent opening of the California Fiber Artists' new show "Material Evidence" at The Art Museum of Los Gatos . The show is up until February 26th, go see it!

My son Zach took these pictures of me, both of my pieces are on either side of a window so the lighting is a bit strange. My smile is a bit strange too, I think I was probably about to tell him what to do, instead of concentrating on smiling nicely. He puts up with a lot this kid.
The first piece is called "Variegated Exit/Entrance", made with all cotton that I've dyed and discharged, plus minimal beading that you can't see except for on close inspection.
The second piece is "Meteor Meltdown", made completely out of recycled stuff. Discharged cotton/lycra, tyvek, wedding veil, thread scraps.

Wednesday, May 25, 2005

Maytide Skies


Maytide Skies, the view from my deck. Wish I could upload the sounds of the bees.

Just got back from driving on a 6th grade field trip to the dump, actually the recycling part of the dump. Where in a few months they will be using the methane collected from the decomposing matter to generate electricity to sell for big $$ I love it! Instead of going into the atmosphere as an addition to the greenhouse gas problem, it will get used up and converted into a usable power source.

But the bad news was that the landfill is filling up fast, maybe it will last 20 more years and is located right on the California central coast city of Watsonville, in primo strawberry growing land. So that the land use, coastal commission and county supervisors have blocked expanding the landfill. So pretty soon, our county will not have a landfill? What the hell will we do with our garbage? Float it around on barges out in Monterey Bay? Hell-oooo people, think ahead...

But the takeaway message for the kids and parents was to use aluminum, then glass, and finally last choice plastic for food containers. Aluminum is easiest to recycle and there is a big market for recycled aluminum, glass is pretty easy too, but plastic takes more processing to re-use, and there isn't much of an end-use market for it...yet. So they recycle it, but can't sell it or even GIVE it to anyone! I think where the state and federal government need to get involved more is on encouraging the end user market by requiring recycled materials to be used when at all possible in new buildings, or furniture for government use, give tax breaks on using recycled plastics in consumer products construction.

I love recycling stuff in making my art, and have been in two fine art exhibits that were entirely composed of recycled materials. Hey, just think, everytime you reuse a Tyvek envelope from your mail to make it into something cool, you're keeping it out of the landfill!