Showing posts with label iron. Show all posts

Monday, June 15, 2026

New Iron Day


As I don't do unboxing videos, here's some unboxing pictures instead of my new Oliso iron. It's a special version that I couldn't resist, because of the lovely purple and the cherry blossoms. My old Oliso iron lasted for ten long years of pretty heavy duty usage and it always worked perfectly for me, right up until it didn't. First the touch lift stopped working reliably, and then it started leaking, so it was definitely time for a new iron. For a tool that I use so much, having one that wasn't functioning properly was super annoying.

I had resisted getting the Tula Pink and the Kaffe Fasset versions, because the main colors of the irons weren't colors that I really like. But this one was so perfect for me. And I learned about a new-to-me artist, Yaya Han, she's a super talented costume designer and cosplayer,,
I didn't realize that I was getting the matching pressing cloth too. Isn't it pretty? The fill pitcher is slightly lavender which was a nice surprise. Those are just my own purple scissors, but I thought they looked nice. All photographed on DH's old lavender work shirt that is in my to-use-at-some-point basket.
I got the iron all set up pretty quickly, along with a brand new heavier duty extension cord. I like to be able to unplug the iron when I go away from home, and the wall plug is in an inaccessible spot. The new iron works very smoothly, the action of the foot lifting is quieter and to me it seemed to heat up faster and a bit higher (that may be due to the higher rated extension cord).

I got right down to ironing a bunch of purple fabrics for the Lupine Mystery quilt and was very pleased to be somewhat back to normal as far as my ironing set up goes..

Monday, February 09, 2026

Bad Bunny Trimming


After making those Flying Geese blocks for the Bamq BOM, I ended up with a bunch of teeny-tiny HSTs™ to iron and trim. All because I didn't bring the special ruler along with me and so I had to make the Flying Geese blocks the "wasteful" way. I wasn't feeling up to going to Costco for our usual Super Bowl speed run, so I set up with my iPad on my sewing table and watched some of the game as I pressed. I may use these teeny-tiny's in the quilt that I make out of all the Bamq BOM.
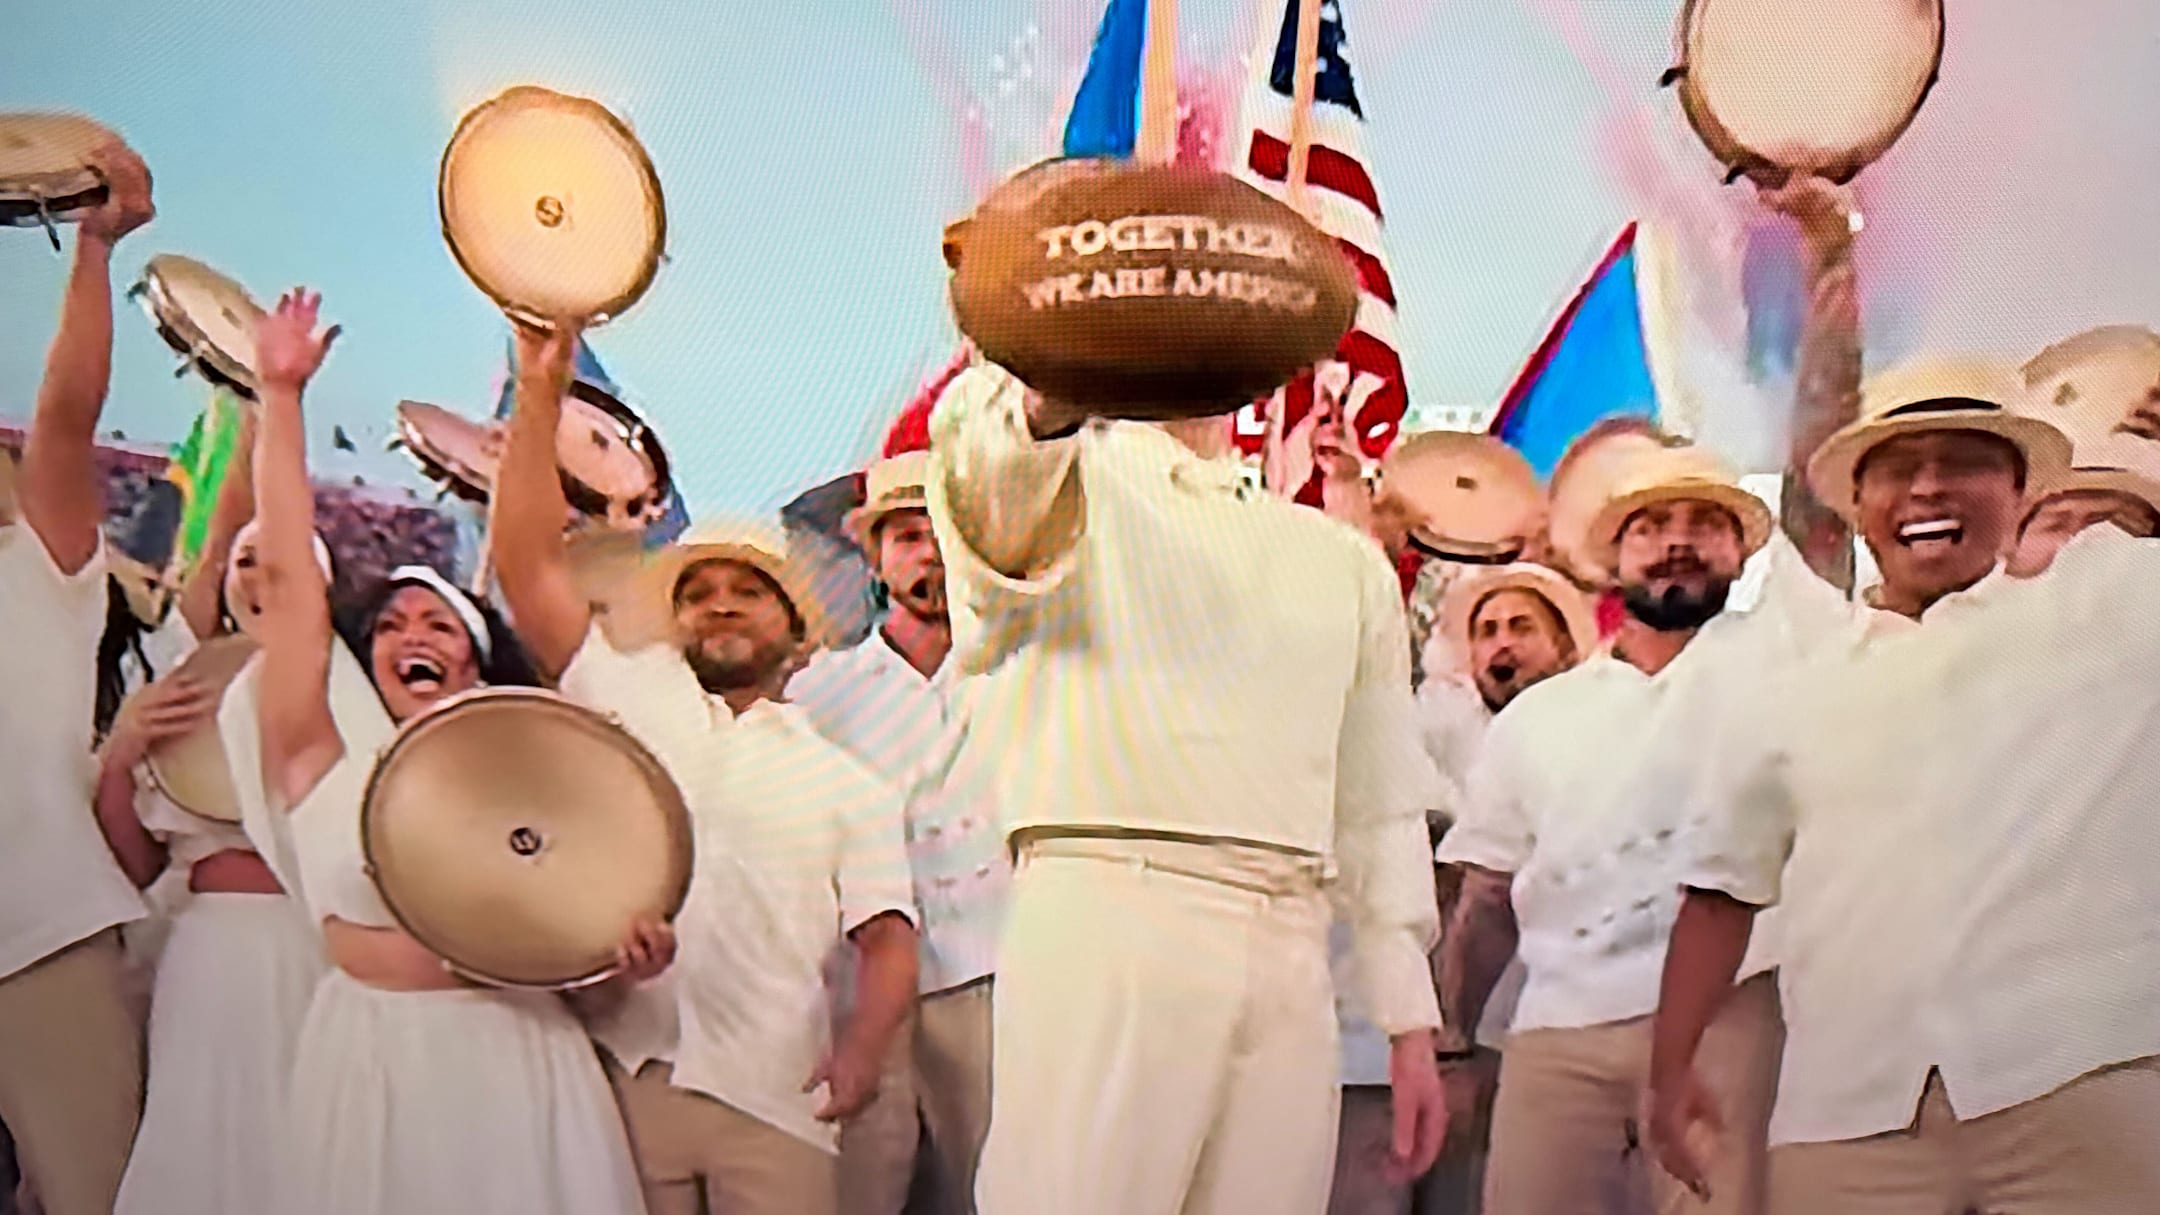
And then I trimmed all of them. It was such a great halftime show. It was like a little mini history lesson and musical and dance party all rolled into one. I don't know Bad Bunny's music at all, I've only encountered him in movies like Bullet Train. He is quite a performer.
I know just enough Spanish to be able to catch a lot of what he was saying and singing, but I looked up the translation of how he first introduced himself: "My name is Benito Antonio Martínez Ocasio, and if I'm here today at Super Bowl 60, it's because I never, ever stopped believing in myself. You should also believe in yourself. You're worth more than you think. Trust me."  What a great message to start out with! 
I had a hard time simultaneously chair-dancing and trimming, but I was careful to take turns so I didn't cut myself. I can see why he's the most popular current artist these days. The NFL was smart to ask him to do the halftime show, they're looking to get a wider range of fans watching worldwide, and the ratings were record-breaking, at least for the halftime.
I'll admit I was crying a bit at the end, Bad Bunny saying "God Bless America" (the only words of English that he spoke) and then naming off all of the countries that comprise South, Central and North America was so beautiful and moving to me. The football that he had been holding the whole show (he got more yards rushing than the Patriots did, hah!), he then held it out and you could see that it said: 
TOGETHER WE ARE AMERICA.   
The big screen at the stadium displayed this very powerful message:

THE ONLY THING MORE POWERFUL THAN HATE IS LOVE. 

Here, here!

That was a really good combination to keep me going until I was all done.

Afterwards, I loved reading all the how-they-did-it information about the complicated production of the half time performance. It was really quite impressive technically, because the limitations of not ruining the real grass playing field and getting set up and off on time. The couple that was shown being married during the performance, actually got married.  This interview with one of the 400 people who wore 50 pound grass costumes (seen above) is a great behind-the-scenes peek of how something like this works. That would have been very fun to be a bunch of grass!

In case you missed it, here's a link on YouTube to the whole thing.

Thursday, December 07, 2023

Product Review: Oliso M3Pro Project Iron.

As I showed yesterday, I've recently received my new Oliso M3Pro Project Iron and it's already been put through its paces on a couple quilt piecing projects. One of the main new features that made me buy this was the integrated headlight. It does a great job of highlighting where you're going with the iron.

Here it is with the other two Oliso irons in my work room so that you can see the size differences. The handle of this new iron is a really different shape that is much easier to grip, which makes it a lot less tiring to hold even though it is slightly heavier. (2 pounds vs. 1.6 pounds)
Size comparison: M3Pro: 7.9” x 4.4” x 4.1” vs.M2Pro: 7.5" x 3.7" x 3.7"  (l x w x h) 
With the first project iron, it was always hard for me to easily tell if it was on or not. That caused a little worry, especially when using at retreats and Sew Day. This one has a big on/off button that is lit up very brightly so you can't miss it. Red is Off. This new model has a stand-by and auto-off mode just like the full-size version does which is a great addition. 
Green is ON.  You can see the well-placed side steam buttons. This one gets super steamy just like the full-size model which is great! It has two spots where the steam exits which is great.

It also comes with a silicone hot iron rest just like the original project iron. That way you don't have to twist up your wrist to set it upright between pressings, it can just stay horizontal. It's a lot easier to use the project iron this way once you're used to staying horizontal with the full-size Oliso.

I find this water fill opening is easier to get open and use. It didn't come with a little fill pitcher though. The new colors on offer are cool too, I like this pistachio green for something a little different.

I definitely recommend this new iron if you're looking for a more ergonomically designed, feature-filled project iron.

Wednesday, December 06, 2023

June Column

 
In the last days of November I was reaching towards  the halfway pieced point in the Temperature Quilt. 

Trying out my new Oliso Project Iron. It's great having the little headlight. I'll do a review of it later this week.
Ironing as I go along is really important to getting this thing assembled well.
I really like how this is looking! Onto July to see more *orange* and *red*.

Tuesday, June 13, 2023

Halfway Through January


Sewing has commenced on the Temperature quilt. Beginning with January 1st. I got setup with a little mini pressing station right next to my machine. Including the clapper for extra pressed-open seams.

Don't mind the water spots, only temporary. Boy is it ever not fun sewing black on black like this. Remind me never to do this again. My eyes have either seriously deteriorated or I need more direct lighting. 
The accuracy of the speciality ruler cut out pieces is really working out for me.
Here's day one of January represented. How exciting to finally begin.

Onto January 2nd!
Here's how the first week of January looks.
A lot left to go for the month.
I stopped sewing for the evening once I reached day 15. It's going pretty slowly together, but I'm trying to stitch slowly and accurately so that the column doesn't get bendy or off.


Tuesday, February 07, 2023

Piecing the Slopes


As planned, the rest of the half rectangle triangles for the Color Collective "Slopes" quilt got matched up and sewn together yesterday. Pictured here with the remaining fabric from the month's bundle, and the left-over scraps and selvedges.
As I was pressing the newly sewn unit's seams open I noticed something. Do you see it?

I have a matchy-matchy situation with my iron happening. For some reason this brought me great joy.
Here are all of the pressed units, old and new that are ready to trim to size. That's going to be a lot of trimming to get done all at once, but I really want to play around with a design and sew these units into blocks.

Saturday, January 14, 2023

Iron Generation


 I finally got to try out some ironing powered by the generator. My DH asked me to tell him when I turned on the iron, he wanted to see how much it would affect the generator we have powering the house. It really dipped down to accommodate the sudden surge, then evened out, every time the iron needed to re-heat itself, another surge, but it held up and didn't poop out on us. Irons really take a lot of power. We don't usually think about it, except maybe at retreats when a bunch of irons and machines are plugged in and breakers are tripped.

I finished sewing another Clover block and now there were 3 that needed pressing so that I can sew them together for 4 finished blocks.

I finally got to try out my new wool pressing mat (Oliso Felt Pro-Press Link) and it worked really well. Here's the before, a big wrinkly mess that I didn't want to try sewing together with the other 3/4 blocks.

Nice and flat! And not wet wool smelling at all (phew).

Here they all are, nice and ironed, but only one of the Clover blocks is sewn together so far.

As seen from the side angle. That's the "please photograph me" pile of quilts in the center. And my studio assistant on the red fabric.

Nicely ironed fabric is of course, a great place to take a bath.

Tuesday, April 12, 2022

Tool Tuesday: The Clapper


I think I found this new tool via instagram somehow, but don't quote me on that. I mean, that was a whole two weeks ago and I can't recall. 
But...it's a clapper!

Nope, not that kind! (sorry,  just couldn't resist) 

 This is the one made for flattening seams in blocks and other sewn seams. You iron your block and then set this device down on the seam and it holds the heat in and weights the fabric just enough to really make the ironing work better without the risk of distortion.

 I haven't gotten to use it yet, so no performance review from me as of this writing. But this is a lovely lovely tool, the wood is beautiful and smooth, the weight is just right, and there are grooves on the sides for your fingers. And as you can see, the seller offers personalization. 
There's a strike of Etsy sellers ( protesting seller fees being jacked up 30% !!) going on right now that RossieCrafts is participating in, but for next week, here's the link to go check it out. 

If you want to support the strike, the Etsy sellers participating are asking people to not shop on Etsy this week April 11-18. 
FYI: the participating sellers have put their shops on vacation mode.

Friday, January 22, 2021

Mini Maker Case Part 2


Okay, back to the Mini Maker Case saga. I got excited the next day and sewed everything together, and didn't pay enough attention to the bottom vs. the top. Oops. Also, why is it so much bigger than the one friend Jaye made me?


Honestly, I liked how this looked, and even tried it out with my mini iron, but it just wasn't as functional to hold the iron securely. This was when the power went out, so I took my seam ripper and the sewn  together incorrectly case outside on the deck to use the sunlight and not rip up the fabrics taking out all the stitches.

Now that it was sewn together the right way, I trimmed the raw edges. Always a **gulp** situation, but I took it slow and it worked out. I'm really glad that I hadn't done this step before I noticed the wrong-way sewing.
All turned right-side out, and it looks so nice!
Here's the back view. 


And tah-dah, all done! And by generator powered sewing machine and battery-powered light.

It's pretty snazzy looking.
And here's the surprise red bias binding on the inside! Finished hand stitching it while crying over the powerful, poem written and performed by our very first Youth Poet Laureate ever, Amanda Gorman. 
I only listened to it on the radio first, because my cell service was wonky because of the power outage and it still moved me to tears.  I saw a few clips later and looked up the whole performance. Yes, tears again. Her visceral acknowledgment of the pain and terror of the last few weeks, all wrapped up with a young person's perspective on hope and belief in our country is such a gift to all of us.

Watch it here if you missed it, really something to see and not just hear. 

I just pre-ordered her new book of poems, The Hill We Climb, and would you look at that, it's the #1 best seller! 

Note: "As an Amazon Associate I earn from qualifying purchases."

Thursday, January 21, 2021

Mini Maker Case Part 1

 Our power's back on, hooray! So here's a longer post explaining yesterday's short one, now that that the gift has been given and I have internet available.


All the pieces, all the parts, all laid out and ready to go to make a Mini Maker Case for friend Jaye
I labeled every single thing as I cut it out so I wouldn't mix the pieces up, because there are a whole lot of them! And yes, that's The Meg over to the right, she's on her bed on the other side of my worktable so I don't run over her with my roll-y chair.
I bought friend Jaye an Oliso mini project iron for her birthday and I wanted to make her a case to carry it to a class at some point in the hopefully near future. Call it an aspirational gift I guess. Of course she very thoughtfully did the same for me for Christmas, it's really nice to be on the same wavelength.
Cutting the rectangles of Timtex into rounded corners with the provided templates. I added some fusible to this so that it wouldn't shift around or bunch up when I started sewing.


I had bought a grey zipper to go with these fabrics, but unfortunately it wasn't wide enough for the pattern requirements. I left myself a note so that I wouldn't just use the grey one when I started sewing the next day. Luckily I had a turquoise one in my stash that was the right size. It's a vintage one, but is in perfect shape.

Hey, not so bad looking of a zipper insert.
I really really like how the lid and handle turned out.
I'll leave it there for now and finish up with showing the rest of the process tomorrow.

Note: "As an Amazon Associate I earn from qualifying purchases."